Wednesday, 20 May 2015

Free For All - Wonky Street Book Cover with Dana


Hi Tando fans! Dana here today sharing a colorful book cover for the Free For All theme this week. This journal cover was super fun to put together! I paired Susan K. Weckesser's whimsical patterned paper and stamps with the Wonky Street Book Cover Kit designed by Neil Walker. I painted the cover with Ranger acrylic paint and added some textured designs with the Susan K. Weckesser A Little Bit Washi Stamp Set. I secured the houses to the book cover with adhesive foam for added dimension. I added numbers to each house with digits from the Arthur Number Set. The Mini People were the perfect size for this piece. I colored them with purple mist. The sentiment from Susan's What's Up Gnomey? stamp set was the perfect finishing touch.

You can find this chipboard and more in the Tando Creative Retail Store! We'd love to have you join the Free For All Challenge! To be in with a chance of winning some great Tando goodies of your choice, please make a piece based on our weekly themes and link your project, not just your blog, using the inlinkz tool located at the top of the Tando Blog. You don't have to use any Tando product, but, if you do, you will be entered into the draw twice! There are no limits to how many times you enter, however, we do request that you only enter your piece for 5 challenges. We look forward to seeing your creations!

Thanks for stopping by today!

Tuesday, 19 May 2015

Anything Goes - Journal Page

Helllooooooooo,

Dawn here with you today showing you a page from my A5 journal..........


Hee hee, I mentioned before that I had loved the colours from our last colour theme challenge!!

Here is what I used, along with various stamps from my stash.....


Cogs Group Mask 15cm x 15cm


A Skinner Stencil/Mask - Tornado


Mini Mask - Distressed Diamond


Mini Mask - Distressed Sequins


If you fancy playing along with any of the May challenges you can link your work with the linky tool at the top of the page. You will be entered into the monthly prize draw for a chance of winning some fab Tando goodies.

Many thanks for popping by today

Hugs

Dawn x 

Monday, 18 May 2015

Anything Goes week!

I love 'Anything Goes' weeks as they are a chance for the design team to show you what else we use Tando products for :-D

Today I have decorated the *3D House Kit* for you to see!  It comes with everything you need except the paint, paper & glue.  The sides concertina out to show mini albums.


This is a lovely project to do and you get instructions for it from our website *here*.  I have used a selection of *DecoArt Fluid Acrylics*, which we now sell...the pigment is amazing...I have watered them down with some white acrylic for this project, believe it or not!!!!!  I also used some fabulous *Sand Texture Paste* on the roof.


This house has gone up to headquarters so if you fancy a nosey just pop along to one of the shows and have a look at this and all our other lovely samples.

Thank you so much for taking a look today, come back tomorrow for some more inspiration!  Hugs, Karen x


Saturday, 16 May 2015

Peel it back week with Irit


 Hello my dear crafty friends and welcome to my Peel it back Tando weekly post.
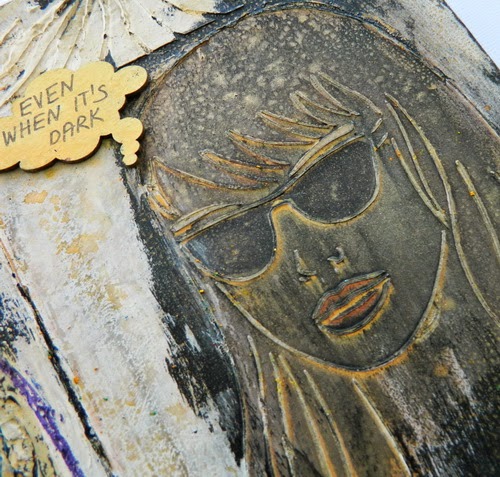
 Irit is here and this is my new art journal page I made for this Peel it back challenge.

I am not really sure what this challenge we - the DT girls- got; so I decided to peel the paint over my double art journal spread and I made this using acrylic paints and pure medical Vaseline (I think in USA they call it Petroleum). I used a few of Tando  stencils to make this page and it's really " stencils only" art adventure.
The left page was made with Tornado stencil and texture paste and then I used Gelatos to color over the dry paste. I added this Tando Speech Bubble chipboard with my own hand writing on both pages and added a bit of golden mist all over the finished pages.


The right page was made with two stencils: the  Giovanna -Glasses and the Giovanna- Eighties stencils.  Same technique and the result is so much different! I peeled some paints mostly over this page and even over the girls image; as you most probably imagine Vaseline just resist the acrylics and we can wipe the paint from the covered sides with a dry paper towel.
Products used:
 Giovanna- Eighties stencil
Giovanna - Eighties

Giovanna - Glasses
Giovanna - Glasses

Tornado
A Skinner Stencil/Mask - Tornado

Speech bubbles
Speech Bubbles Small


Friday, 15 May 2015

Peel It Back - ATC Notebook


Hi Tando fans! Dana here today sharing an ATC size notebook for the Peel It Back Challenge this week. I soaked a white lined Artist Trading Card in water until it was saturated and then carefully pulled the layers apart.


Once the chipboard was dry I used the thicker piece for the back cover of the notebook. I covered the thinner piece of chipboard with patterned paper. I painted a Mini Heart with red glitter paint and a Mini Star with yellow acrylic paint to create a layered embellishment for the cover.


I cut pieces of graph paper to fit between the covers. I used a hole punch on the covers and pages and attached all the parts together with a jump ring. I love that Tando chipboard keeps its integrity even after being soaked in water!

You can find this chipboard and more in the Tando Creative Retail Store! We'd love to have you join the Peel It Back Challenge! To be in with a chance of winning some great Tando goodies of your choice, please make a piece based on our weekly themes and link your project, not just your blog, using the inlinkz tool located at the top of the Tando Blog. You don't have to use any Tando product, but, if you do, you will be entered into the draw twice! There are no limits to how many times you enter, however, we do request that you only enter your piece for 5 challenges. We look forward to seeing your creations!

Wednesday, 13 May 2015

Peeled Tree

Hello!  I have used a *CLOUD TREE* (pack of 2) to peel this week.  I am pleased with how it turned out and that has to be down to he quality of the chipboard these shapes are cut from!


I dunked the top of the tree in water until it was wet through then gently peeled and squished each layer to how I wanted it to look when dry.  Its pretty wet so I left it on a radiator overnight.  They layers came a little adrift at the top but it was easy just to glue the centres of them back together again!


The tree was then painted with acrylic paint in different greens and some clear glitter glue applied in places.  The trunk was also painted with acrylic.  I decorated a *MEDIA BOARD* (pack of 5) for the tree to sit on, adding some stamping & stencilling (*MINI MASK*) to add interest.

Here are the products I used:


Thank you for looking today.  Enjoy hugging a tree!  HUGS, Karen x

Tuesday, 12 May 2015

Peeled Scallops

For the peeling back technique I've made a card:


I soaked a ~{Scallop}~ and a ~{Button}~ in water for about 5 - 10 minutes - make sure it's completely submerged - and then carefully separated a couple of layers. Mine was actually whiteboard so the white layer came off and I've saved that to use for texture on a journal page.

Once they are separated, leave them to dry completely. I'd recommend splitting them in the evening and letting them dry overnight unless you live somewhere warm. If they are damp you run the risk of them becoming damaged.

I then painted them using DecoArt's White chalk effect paint mixed with ~{Quinacridone Violet}~,  ~{Cobalt Teal}~ and ~{Napthol Red Light}~ fluid acrylics. Once dry I used Gelatos to add some shading, stamped on the button then gave everything a coat of ~{Clear Liquid Glass}~.

I've used 2 stamped birds that I watercoloured and cut out. Once everything was dry, I added a ribbon, some doodling, glued everything in place and finished off with a greeting.

Keep checking out the ~{Blog}~ this week to see what the rest of the team comes up with.

Kaz xxx