Saturday, 6 November 2021

Book trio with shelf unit by Sharon Nettleship

 Hi there and today I'd like to show you my very first kit of the month project for Tando Creative. This is a great little project with endless possibilities of colours and themes and I had a lot of fun making my books and case. 

The Base 


I gessoed my base pieces and then let them dry. Using my finger I dabbed texture crackle paste over all the parts including the Nature letters. The letters are Tando's block serif greyboard. I let this dry and then added distress oxide and gloss sprays. 

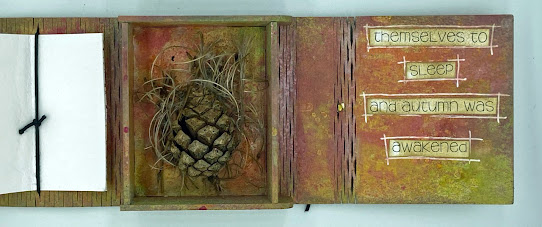
Autumn Book


For my Autumn book I applied little strips of book paper all over the cover. For the Tando greyboard leaves I again applied the texture crackle paste with my fingers. I then applied a layer of gesso. 


I used gloss sprays to cover it all (including the inside and spine) and then accented it all with gold wax. I've used gold paper fasteners and black elastic to make a little enclosure. 


Whilst out walking I came across these little pine cones with foliage so I thought they would look good in my Autumn book. I've adhered them to the inside boxes. The sayings have been printed out from my PC and I have just added a little ink and gold wax. I also put some tiny signatures in each of my books. 

Ocean Book


 I gessoed my Ocean book first and once it was dry I stencilled a wave design with fine texture paste to the two inner pieces. I coloured the book with distress oxide inks in ocean colours and sprinkled some water over it to add some texture. Next I added randomly some frantage shabby blue embossing enamel. 


I made some little embellishments with air dry clay which I coloured with cosmic shimmer powder and silver wax. 


I added the seahorse and two shells to the spine. 


I adhered the rest to the insides of the boxes and again added the sayings and signatures. 


I didn't have any white fasteners so I embossed them with white embossing powder. 

Flowers & Butterflies Book


I worked straight onto the book for this one. I used strokes of chalk and fluid acrylic paints and then added some silver wax. 


I used Tando flowers and butterflies for embellishments. I dry embossed the larger butterfly and flowers with an embossing folder. I then used the same colour paints to decorate them and some silver wax.


The larger butterfly and two layered flowers were added to the spine. 
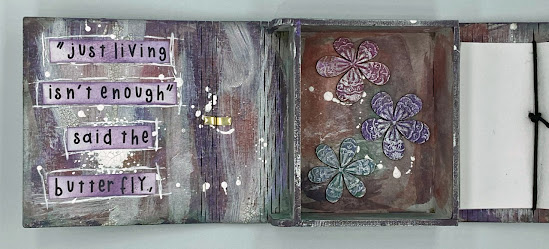


I then added the embellishments and sayings to the inside of the book. 
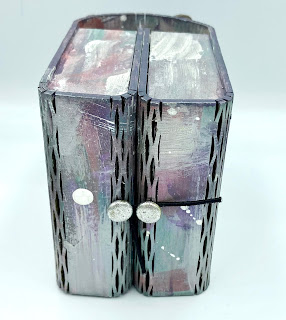

I've used silver embossing powder to colour the fasteners to match the book. 
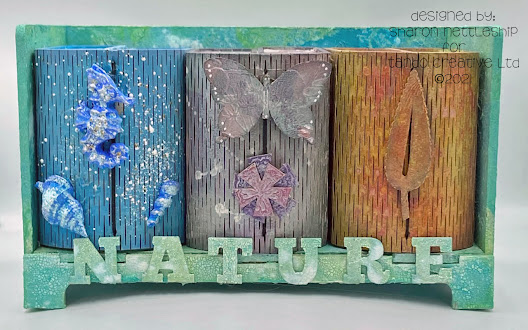

Here is my finished piece. I hope you enjoyed my step by step and have a go at designing one yourself. We have a great Facebook group Tando's Creative Zone where we'd love to see all your makes. 

Tando products used:

Shabby blue embossing enamel 

All other products are from my personal stash. 


Friday, 5 November 2021

Large Matchbox Kit - Zoƫ Sanderson

 I love mixed media, 3D, projects.  Any excuse to get inky and messy I'm in the thick of it.  This is the second of the two Matchbox Kits I got from Tando, purchased before I became a Kit Ambassador for them but it was fun recording all the stages and now sharing the process with you all.

This is the finished result, yes starting at the end is a good way to start with this!


These kits come in laser cut chipboard, the 6 inserts are much thinner chipboard and are supplied as separate pieces.   The individual parts just need to be gently eased out of the board.  All the parts are precision cut to fit together.
 

The first thing to do once they are released is to paint them.  Normally this would start with a Gesso base but starting with the inside of the inner tray Deco Art Acrylic paint in Carbon Black was applied   The tray was then glued together.  PVA glue applied where the edges meet everything slots together.  When the glue was set the outside walls were painted with Green Gold, which might just be my favourite green paint, and then a top coat of Deco Art Media Interference in Green.  
 

Next, the outer shell and the inserts were also painted with Carbon Black paint.   This paint going directly onto the naked board have covered brilliantly.  


The 6 inserts were also given a partial covering with  Deco Art Media Crackle glaze.  Each one received the glaze in different places and thicknesses.  


The crackle glaze was left overnight to completely go off then using the best applicator around gold tone Treasury Gold was gently touched over the glazed areas.  That applicator? my little finger.

Six pieces of white card stock were cut 5 1/2 inches x 2 1/2 inches to fit inside the 5 3/4 x 2 3/4 inch inserts.  These pieces of card were then stamped with Chocolate Baroque floral images.   Wild Honey Distress ink blended around the edge of the cards, the stamped images were coloured with Chameleon Pens.  Then it was simply a matter of attaching the cards to the inserts.


Turning back to the outer shell, and loving the effect of the crackle glaze and Treasury Gold the same technique was used on the top.  Over that is another piece of white card dusted, stamped and coloured in the same manner as the inserts.


For extra interest and embellishment butterflies seemed like a good idea.  2 painted black all over, now I wondered if interference green would look better if it was applied and then crackle glaze placed over that or if the crackle should go on first.


When they were both finished and dry the wings were lifted just a little for dimension and then they were attached to the shell top with PVA glue just along the butterfly body.  Both look great but my preference is for the one with the interference below the crackle glaze, bottom right on the image.


Hang on wasn't there something about experimenting with some paints?   Below is a picture of the backs of the inserts which have been painted and in some cases had a corresponding interference top coat added.


I hope you have enjoyed this look at my process and that it will encourage you to get your paints out and play.  

Products used.


DecoArt Acrylic paint Carbon Black
DecoArt Acrylic paint Green Gold
DecoArt Interference Paint Green


From my own supplies
Treasury Gold Gilding Wax
Chocolate Baroque Rubber Stamps
Chameleon Pens
Wild Honey Distress Ink
White card stock

Thursday, 4 November 2021

 Hi everyone This is my take on the November kit of the month 


This kit slots together easily-I just used a bit of of pva glue along the joints and edges


l
Once dry paint black gesso over all surfaces.

Cut paper to fit all sides of the bookshelf, cutting size slightly smaller than sides to leave a black border. I used a corner rounder for a good finish.


With my finger I edged each piece with gold paint.


.

I added fairy and mushroom silhouette stamps on shelf and box pieces


Concentrating on the box books- paint the bendy spine with gold acrylic paint, then glue peach lace along spines to tie the box together.


Add cut and stamped panels to front and back.


.


Using prima and stamperia moulds I created hearts, wings and butterflies using air dry clay. Leave to dry then paint with black gesso. When dry, dry brush with gold acrylic paint.


Glue wings to hearts and attach to bookshelf using a glue of your choice.


To complete the two outer boxes I filled small bottles with glitter, added charms and beads then stuck them in position. For the middle book I used alcohol pens on some plastic butterflies then added glitter and beads. I then mounted them on small strips of card one end glued to the box , the other to the butterfly to give movement.


To finish I added butterflies, flowers and wings to the spines.


Wednesday, 3 November 2021

November Kit of the Month - Zoƫ Sanderson

Good Morning,  Today I'm sharing my first Kit of the Month project.   Let me say right off that my process usually means that the finished result will be a surprise to me when completed.    Such was the case with this project, Mini Trinket Box/Book Trio with Shelf Unit and this month's colours appealed to me although my greens are bolder than those on the colour board.


So the starting point was the first of the book boxes.  There are 3 of these each a strip of Tando Chipboard with curving sections and flat sections.   Slots have been precision laser cut for the box walls to slot into.  There are 8 box walls 4 with right angle corners and 4 with 2 curved corners to support the covers.   All the elements given a coat of gesso on both sides.


Out came my pots of DecoArt acrylic paints.  Magenta mixed with white created the pink other parts painted black with an overcoat of Magenta Interference.   The box walls were painted in the same colour scheme pink for the inside and black for the outside.   Then I decided that the pink was well just too pink, so a coat of unaltered Magenta was applied.


For the outside Magenta and Black with Interference like the inside.   Two Keys from Tando Mini Keys, carefully eased out of their carrier board and painted yellow.  Attached to the narrow flat sections, the end sections form the box lids these were coated with DecoArt Crackle Glaze and left to dry.  Next day Treasury gold rubbed over glazed section.


The close up shows the detail of the crackle glaze.   The gilding polish was also roughly spread over all the edges.


These are boxes and I wondered what to put in them, everyone will have their own ideas of how to use them.  As there are keys on this using some shell pearls, clear quartz chips and Mother of Pearl shapes became the treasure locked inside.  The surfaces that become the outer cover when the box is closed were stamped with an old, no longer available, stamp from my stash.  A piece of broken jewellery was suspended on the outside middle curving section.


The second book box was painted in basically the same way with green instead of magenta.  In my stash there are lots of Tando mini kits and grab bags these provided the various elements I used to decorate the inside.  Pictured here they have been painted and the layout tested, the brown is a mix of Violet and Yellow if you are wondering.


For the outer cover I used a stencil, some translucent embossing paste and green mica powder.   This is before the the paste had set.  Two little Tando people painted violet with a topcoat of violet interference were popped onto the narrow ends.


Another of my loves is texture so when the Tando pieces were attached to the box tops a thick layer of Gel Medium spread over the flap to hold the embellishments and create an uneven surface.


For the third and final book box the colour theme stayed green and black.  Did I mention that experiment is part of my process?  How would it work out if the crackle glaze were pushed through a stencil?   It worked jolly well the stencil, Tando Dotstream, clearly represented and the little air bubbles add more texture to it.   


The outside has been painted in the greens again then stamped with some images that came with a magazine.  We all have plates and plates of stamps projects like this are great to use them on.  The scallop shell has been stamped over a stamp of dots.   The dots reminded of a winning picture in the Wildlife Photographer of the Year competition, the winning shot is a cloud of fish sperm released by lots of male fish clustered around a female who had just released her eggs.  The survival to adulthood of the fry is 1 in 1,000,000!  Having these dots representing that here seemed fitting.  The greybeard finally given a coat of Gel Medium and crushed glass sprinkled into the medium before it dried.


All the fish used in and on the 3rd book were painted with an orange colour that I mixed with a Primary Red and Primary Yellow from DecoArts.


Finally it was time to make up the MDF precision cut shelf unit for the box books to sit on.   Once again the kit comes flat pack, and the elements painted with gesso before being glued together.  


In a previous post I pointed out that if you don't like the result you can always overpaint your project.  That happened to me here.  The shelf was going to have a yellow undercoat and then lots of Green, Violet and Magenta marks.  The stencil was used again with a crackle effect embossing paste.  When it was all dry it was not working.  Plan B then another old crackle medium from my stash which requires 3 days to set.  For 3 days then the shelf sat waiting for the magic to happen.

Once dry some resist paste touched over various areas and then black acrylic paint brushed all over.  Then it was wiped back with a baby wipe.  Popped some Violet Interference over the top, result a wonderful distressed looking shelf unit with lots of yummy texture.


As you can probably tell putting this kit altogether was great fun.  Everyone will have their own ideas about to how to decorate one of these I hope you will share yours with us on our Face Book Group.  We would love to see what you do.

Products used.
Tando

DecoArt 

All other elements, mediums and stamps from my stash, many no longer available.  Use what you have to hand this chipboard takes a lot.

Tuesday, 2 November 2021

Deep Book in a Box - by Kim

The Book of Shadows


This is an interesting shape, and I instantly imagined it as a wooden box, wrapped in antique leather to look like a mysterious old book.


First, assemble and glue the box ensuring a good fit with the pieces. Allow to dry thoroughly.

The curly trim is small butterflies cut in half lengthways and glued. Any decorative trim will do. The title rectangles on the book spine are Tando off cuts.


Faux Leather outside

I only added ‘leather’ to the flaps and spines and avoided the expanded hinges. You will need thin tissue paper, I used the sort that is used for wrapping, and ordinary PVA.

Cut a piece of tissue slightly bigger that the panel you are covering. Use a brush to spread a good coat of PVA over the panel - avoiding the hinge. 

While the PVA is wet lay on the tissue - make sure it is wrinkled by moving it slightly with your fingers before the glue dries. With the glue brush make sure it is stuck down all round the edges, and tucked up to the curly trim.

Repeat for each panel. Don’t worry if you make little tears in the tissue, they won’t show when it is finished.

Let it dry - overnight is good.

Trim the excess tissue with a sharp knife and tidy the edges.


Base coat the entire outside with Lamp Black. Let dry.

Mix True Red with a little Lamp Black to get a dark maroony-red. Start with 5:1 and adjust to taste. The black is stronger so add the black to the red little by little. With the mix, using a fairly dry brush, paint over the black but leave random spaces so that you get a textured/weathered look. Let dry.


To bring out the texture I used Duncan Iced Espresso and Champagne Ice Metallic Lustres. The lustre is on the trim, too.


Base coat the inside of the cover with black.


Faux Wood box

I tried to match my ‘planks’ with a pine table at home. Start with a yellowish-beige base. I mixed Yellow Ochre with some Burnt Umber. It doesn’t matter if it goes on a bit patchy because natural wood isn’t perfect.

When you are happy with the base coat - and it is dry - use Burnt Umber to paint on the wood grain. Add some small black marks to the grain for added realism.

Copy what you see on a piece of wood you have - a table, worktop, or chair. Practice on a spare surface to get the look you want. If you don’t like what you see, paint over it and start again.


Book covers

I found some super hand made Gelli plate printed background papers, by Julie. I cut them larger than the size needed and glued them on with PVA. When dry I used a flexible sanding block to remove the excess - by sanding the edge to give a ‘blended’ feel. I finished the edges with Metallic Lustres. The expanded hinges were not covered, but I did wipe on some lustre. On the spines of the small covers I painted black, and when dry used gold ink and a dip pen to write the titles. I did the same on offcuts glued to the larger covers. Inside the book covers are painted black.


I opened only two of the holes on the outer flap after covering with tissue, and use a length of gold leather decorative thonging to hold it closed.


Items Used:

Tando offcuts

Two small butterflies or similar for trim

Tissue paper

Background papers of your choice

DecoArt Metalic Lustre - Iced Espresso/ Champagne Ice

DecoArt acrylic colours as described