Tuesday, 15 February 2022

Hex Tech Tuesday - Bird Bath by Art Angel


Today I am goung to show you how i made a bird bath using the fabulous Hexagons pack. The packets contain so many different sizes with solids and frames that you really do have a lot of different options for creating. These are ideal for 3d projects as the greyboard is very sturdy and of a thickness that allows for them to be taped and glued on the edges
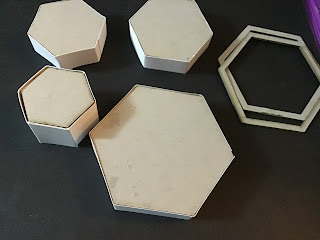


I chose  the largest hexagon for my base and a range of differing smaller sizes to construct the bird bath itself. I needed a pair for the base, a pair for the column, two pairs for the water receptacles and
A final pair for the supporting column between the baths

I also had a stack of frames in the same sizes as the water receptacles to build up my bath sides


Staring with the largest pair, i measured one side of the hexagon and cut a strip of 300gsm card 6 times that length plus a little extra as an overlap
I ran red liner taper along both the top and bottom edges


I peeled back the red liner and adhered my card to the outer edges of one hexagon

As you can see in the above picture, i stuck four sides, it is by far the easiest option to slot your second hexagon in now rather than sticking completely and trying to insert the second on the top, if it falls all the way in its a pain to get out
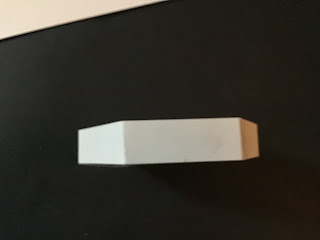
 

The aim is to make a solid structure almost like a drum


Repeat the process for the two colums and the hexagons that are going to be used to create your water receptacle


Using good pva glue i started to assemble the now 3d elements and added the hexagon frames to build up the walls of my bird bath


Using a palette knife i proceeded to cover the entire structure with texture paste, paying particular attention to the walls of each bath as i needed it to be completely encased to avoid any leakages later when the “water” was added


Make sure the column is well covered as this provides overall support


Glue structure to your main base


When dry paint according, i used decoart paynes grey fluid acrylic paint with titanium white dry brushed on over the top to bring out texture from the paste as i wanted an old stone feel but you could go for yellow sandstone if you wished


To create the water effect i filled my baths with Decoart extra thick top coat coloured with turquoise shimmer and then used a hot glue gun to create water splashes over the sides, once dried i painted over with a blue shimmer paint


I added some grass tufts and moss from my stash to add the finishing touches, all it needs now is a couple of birds!!


Hope you all enjoyed this project and i hope you will all try taking your makes off the page and have a go at creating something 3d x x x

I used


Sunday, 13 February 2022

Good Time Tags by Sarah


Good TimeTags


Materials

Decoart paint in blues and greens

Tando Grids: Moroccan

Moroccan grids/Stencil

Distress Glaze

Black ink pad

Distress Oxide in Speckled Egg and Frayed Burlap

Tando Flora Fauna embellishments

Tando Tags

Foam Pads

Stick on pearls

Ribbon and bakers Twine

Rubber dance Stamps

Posca Pens

Gesso


Instructions

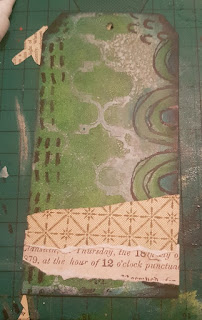
Whilst constructing my Crafty Twirly Whirly I had lots of paint and bits left over so I put them to use on some Tando tags. I painted the tags in Gesso then green paint. I didn’t like the brush stroke look so I took a sponge and dabbed it all over.


Next I took my Moroccan stencel and layed it on top of the tags I took some distress glaze and carefully with a spong rubbed it over the stencil. The glaze acts as a resist for anything going ontop. Next I sprayed on distress Oxide in frayed burlap. Once dry I spritzed on some speckled egg. I then spritzed on some water. I havent used the Distress glaze before but I was quite pleased with the BOHO moroccan effect I achieved. Where there was bare patches, I dabbed on more paints in the blues and greens and gesso down one edge of each tag


Tag 1

I took some doodle stamps and stamped around the outside edge before adding some strips of patterned paper along the bottom


I then painted some Tando Fauna Leaves in green and added them to the bottom of the tag, before layering on some stamped flowers and a sentiment. I painted a Tando grid and added the inners to the top of the tag


Tag 2

For tag 2 I stamped some doodles around the edges and added some patterned paper to the bottom but this time I stamped rainbows along the right hand side. I then coloured them in with posca pens. I also added a Tando Grid to the left hand side


I also had a baby wipe that I used for clean up that I thought was just beautiful. So I stamped some flower images on to it and carefully cut them out. I then began to layer up some Tando fauna and my flowers before adding a sentiment.


I hope you like my tags. They are very bright and happy and perfect to add onto a card or just to seen to a friend with a note.

Sarah
I h


Friday, 11 February 2022

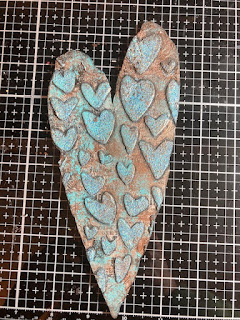
Grungy Valentine Heart by Bernadette


Good Morning Everyone

My last Valentine make was a tag which was all pink and red - this one is very different.


I started with one of the large Tando distressed hearts https://www.tando-creative.co.uk/distressed-hearts-large.html There are 6 in a pack and they are a great size to work on, but lightweight and thin enough to add to a large piece or card, journal or canvas.  


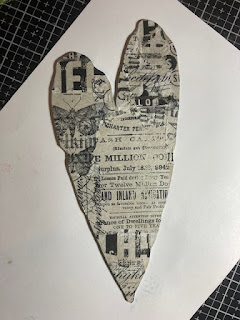
The first thing I did was to gesso the heart using white gesso.  I then added some Tim Holtz collage paper which I tore into small pieces before sticking to the heart.  I wanted to seal the whole thing so I then added a layer of collage medium over the top.


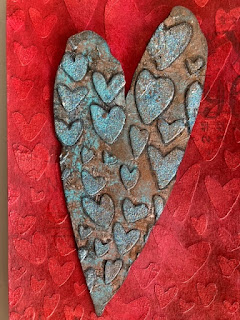
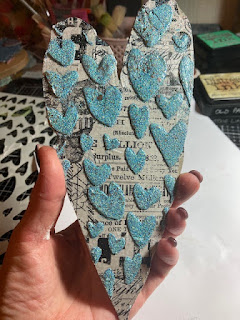
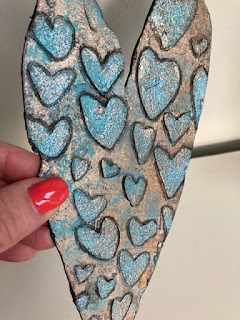
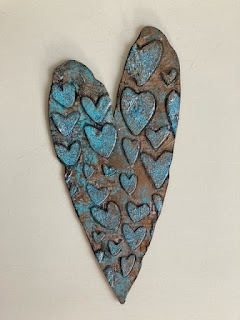
I then took a stencil and added texture paste through it.  I used the All and Create stencil you can see in the background to the left because I didn't want a perfect heart shape for the look I wanted.  As soon as I added the texture paste through the stencil, I poured embossing powder over the top of it.  The embossing powder I used is a mixture of blue tones and metallic.  I let that dry completely for a couple of hours - drying time will depend on the texture paste you use.  

You need to make sure you add the embossing powder to the texture paste straight away, before the texture paste forms a skin and resists the powder.  Once the paste had dried, I melted the powder with a heat gun just as I would if I had sprinkled the powder onto an on inked stamped image. 


My next step was to add colour to the background to try to make the hearts pop.  Because the embossing powder I used had metallic flecks in it, I wanted the background to have a metallic look.  I used a brown and gold metallic paints and dabbed them onto the background with a small stencil brush.  I then took a turquoise coloured paint and added accents, again with a small stencil brush, here and there over the browns and metallic paints.


Once all the paint was dry, I took a black watercolour pencil and drew around the hearts.  I used a damp paint brush to smudge the pencil lines


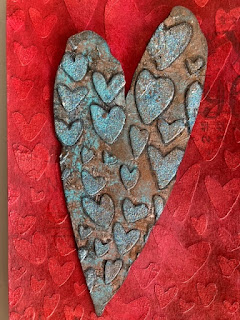
I made the red background for something else but I quite like the heart and background together.


I'll be back soon with some of the new products Di is bringing to the store!!


Take care and enjoy your weekend.


Bernadette xxx


Thursday, 10 February 2022

Something you can hang - by Zoë Sanderson

 Hello, I had a little play earlier this week and took a few snaps along the way to share with you.


This is a side view of the finished piece, a resin piece on one of the Tando Plaques resting on a Tando Tag Stand.

Starting point


With something like this resin cast you need a strong background to show it off out then with the Black Gesso.  I've had this pot for years and expect it to go on for a long while.  It also goes on well and with a  well loaded brush one coat will be sufficient.


As the main piece of this is a phoenix a few flames in the background will look good.   An old stencil which had structure paste pushed through at the sides that the cast piece would not cover.   Then it was a wait until the paste had dried.  When it was ready the stencil went back on and magic mica rubbed over, in colours to match the main piece.


Then it was time to glue everything together I used silicon glue for a strong hold.  Then gave all the edges a covering of silver wax.  The greybeard just takes all these different mediums in its stride.


For the stand I just used some gold finishing paste applied all over care being taken the the slots do not become clogged.  And there it is something to stand on a shelf or with a ribbon or chain hang on a wall.

Products used

Tando Assorted Plaques

Tando Tag Stand

Everything else from my personal stash.


Tuesday, 8 February 2022

Hex Tech Tuesday - Sun catcher by Kim


 The Tando Creative Hexagon pack comes with an assortment of sizes, some solid and some as frames.

I chose all the open frames, you can use as many as you like. Then, thinking about what I wanted to achieve, I arranged them in an attractive shape.


Next, I glued them together using PVA. I spread the glue along one edge at a time and built the shape gradually, allowing each piece to dry before getting too carried away. Keep your arrangement on a flat surface so that  it doesn’t twist before it is dry. It is a bit fiddly, and make sure the shapes don’t


stick to the surface you are using.


Once the shape has dried and is firm, I painted it with DecoArt Lamp Black. Paint both sides, and when it is dry check for missed bits.

Now you can plan where you want to put your flat hexagons, make a note or take a photo of your final layout for future reference.


Now the fun bit! I used Ranger Alcohol Inks on clear acetate sheets to make a bright and colourful background. I used Limeade, Gumball, Dandelion, and Patina colours. I added a few splashes of Piñata Brass for accent.

I had to use two sheets of A4 acetate because my shape is quite large. I left my sheets to dry overnight to ensure I didn’t smudge them.


When the alcohol inks are thoroughly dry the next stage is to glue the hexagon shape on to the acetate, so that no joins were visible. I used all purpose solvent glue.

I glued the upper sheet first, then carefully cut round the bottom edge of the hexagons. Then I matched the lower sheet and cut round that to fit.

I trimmed around the shapes with a very sharp Xacto knife after the glue was dry - be careful when using sharp tools.

The acetate side we’ll call ‘the back’. I used ‘all purpose’ glue for this as I needed it to dry quickly.


Once the acetate is attached to the shape, and while it is drying, it is time to sort the flat hexagons.


On one side I glued cooking foil with the shiny side up. I used PVA for this bit. The other side and edges are painted with DecoArt Lamp Black. 

When they are dry, trim round with the sharp blade. Refer back to the practice layout and glue the flat hexagons into place on the ‘front’ of the frame. Put the foil side down - towards the acetate - so that light coming through is reflected back on to the surface.

The black fronts contrast beautifully with the light and colour shining through.


All that is left to do is to hang it in a window where it will meet the sunshine and play a medley of light and colour around the room.

I used black copper jewellery wire to make a hanging loop, then used all purpose solvent glue to attach it to the frame. I had to experiment to find the best place to put it so that it hangs vertically.

I left the glue to set overnight because I wanted it to be really firm before it took the weight of the finished sun catcher.


Click the link to see the sun catcher on my Instagram feed.


We just need plenty of sunshine to get the most from our sun catcher!


Products:

  Tando Creative Hexagons

  Ranger Alcohol Inks (colours of your choice)

  Jacquard Piñata Brass 

  Acetate sheet

  PVA and all purpose solvent glue