Monday 25 December 2017

Holly Peace - Brenda

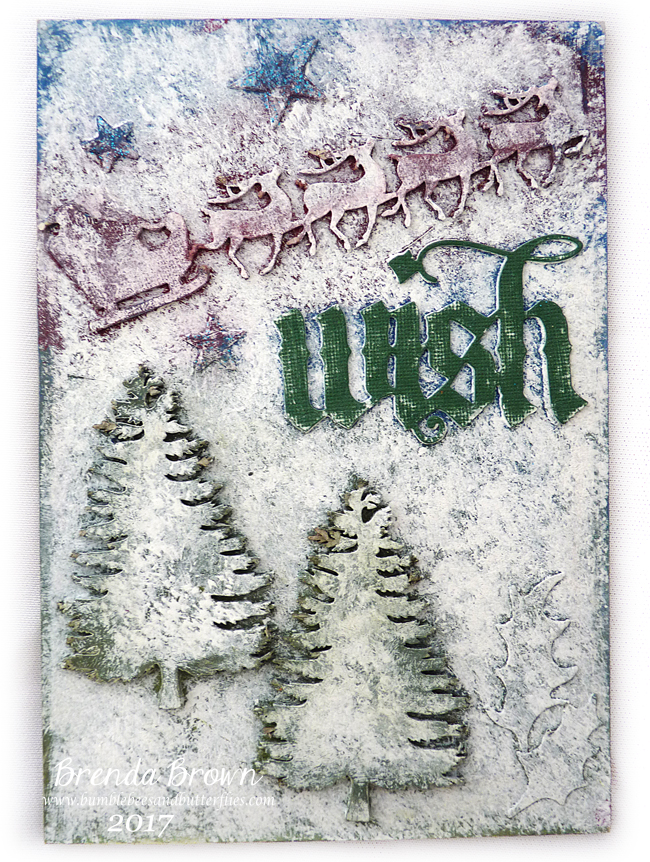
Hi it's Brenda here with the last of my Christmas stand up cards for this year which uses the beautiful holly chipboard which I have cut to fit to the size of the chipboard back piece.


Like the others in the series I have adhered all the chippies and die-cuts before painting with DecoArt media acrylics and stippled over with chalky finish paint.


 I added some watery washes over the top to create more depth of colour on this one .....


... and added a die-cut sentiment.


From Di and Tony at Tando Creative and from all the Design Team we wish you a very
Merry Christmas 
and a happy, healthy and peaceful new year.

xxxxxxxxxxxxxx

Friday 22 December 2017

Santa's Wish - Brenda

Continuing the series of Christmas stand up cards this one has a chalky finished background and uses the white backed greyboard and gorgeous embellishments supplied by Tando.


Only 3 more sleeps till the big day.

hugs Brenda xxx

Wednesday 20 December 2017

Christmas Birdhouse Tutorial by Jane

Hello!

Today I am here to let you know that I have created a tutorial for the Tando Creative Christmas Birdhouse that is coming soon to the kit tutorial section of the blog.

Here is the completed project and a link to the kit can be found HERE...


Happy crafting,

Jane xx

Monday 18 December 2017

Tag and Media Board Gifts

I've made some little gifts for my family using the Tags and Media Boards from Tando.

I've used the stencil from {Fashion Dame Stamp Set} and DecoArt {White Modelling Paste} onto one of the {Tags Mega Bundle}
Once this was dry I gave it a coat of {White Gesso} and then a layer of Turquoise acrylic paint.
I added some {Quinacridone Magenta Fluid Acrylic} and then lightly removed some from the texture with a baby wipe.
I then added some white acrylic paint highlights using a make up sponge.
I punched holes in the bottom of the tag with a crop o dile for some ribbon to hold a mini pen.
It was finished of with a tiny bit of stamping, some mini grungeboard letters and a set of post it notes:


I made a few more in the same way. This one used {Bullseye stencil}


These are the smaller {Media Boards} and I've used the {Letters Stencil}:


Kaz xxx

Saturday 16 December 2017

Reindeer Wish - Brenda

Hi Brenda here with another of my stand up media cards in a Christmas design. It was made in exactly the same way as the Snowflake Noel card I showed here on Monday using DecoArt media acrylics and chalky finish paints.


Di has this gorgeous reindeer in her Christmas selection both in this large size and in a smaller one too.


The sentiment is a Tim Holtz die, I love the very old manuscript style of font and the snowflakes can also be found in the Tando online shop. Just click the links and you will be transported over to the products.


I used various blue, red and brown paints to get the background colours and stippled Everlasting chalk paint over the top when it was dry.


I also added an easel to this particular card but others I have designed have a stand up frame on the back just made from two pieces of card.


I hope all your Christmas preparations are going well.

Have a great weekend.

hugs Brenda xxx

Friday 15 December 2017

Grungy Bauble


Hannah here with a nod towards something festive! As always I had to include grunge... and rust! I hope you enjoy and may you all have a wonderful festive season.


The round frame from the Tando Shadow Frame makes the perfect base for a bauble decoration. For the base layers I used DecoArt Americana Decor Chalky Finish in Relic, Rouge and Everlasting. Rubbing away layers to reveal the layers underneather adds a great grungy look. I also added a layer of Crackle Medium to further enhance the weather worn style. 
Washes of DecoArt Media Fluid Acylics in Payners Grey and Quinacridone Gold further ages the base layer.


For the central motief, I used the diamonds from the Diamond Grid to create a star design. Painted in Metallic Gold and aged with Crackle Glaze and Carbon Black Antiquing Cream, I also used this same painting process on the edge of the frame.

The star has been further embellished with a cog and bolt painted in a rusty finish.


Here you can see how the Antiquing Cream works into the cracks produced by the Crackle Glaze. I have strung the bauble using rusty wire to further enhance the grungy look.


Tando products used;


Wednesday 13 December 2017

Santa Baby..

Morning all,

I have a little Media Board make for you today, having a bit of fun with my skull stamp!


I painted a Tando Media board with gesso, and then a coat of Silver Acrylic.  On top of that I stamped the skull stamp, and then used a baby wipe (slightly dried out), to apply Pyrrole Red by dabbing around the edges of the board.


I drew Santa's hat and nose in pen on top of the skull, and painted in Pyrrole Red.  Glitter paint was added again in red, and his hat was finished with Snowtex.  I rolled a little ball and squashed it for the bobble!  I'm loving Snowtex, it's a really fun product, but doubles brilliantly as a texture paste too.

On the bottom of the board I added the words 'Santa Baby' as the song came into my head for some reason.  Any black pen is fine for this, I used a Micron pen.

Hope you like this fun alternative make. xx

Merry Christmas all,

Nikki K.
xxx

Products Used:

Tando Creative:
Mixed Media Board
Mixed Media Boards 74mm x 138mm

DecoArt Media Fluid Acrylics
DecoArt Snowtex
DecoArt Glamour Dust Glitter paint - red.


Monday 11 December 2017

Snowflake Noel - Brenda

Hi Brenda here with one of my stand up cards using white backed media chipboard cut to 12 1/2 x 18 cms. This design uses a snowflake flourish set I had in my supplies made by Tando but I'm not sure if it is available at the moment. The techniques and finish were inspired by attending Andy Skinner's Mixology class back in November and I used media fluid acrylic paints and chalk paint to get this lovely coloured snowy feel.


The chipboards and die-cuts are adhered to the greyboard first of all....


.... and when they are dry paint a good coat of blue with decoart acrylics and when that has dried stipple some Everlasting chalky finish paint over the whole surface but leave some of the blue showing through. You have about 15 minutes to knock back areas and edges of the shapes to reveal a little more of the blue beneath. Use a damp babywipe and dry kitchen towel.


I had glued one of the sentiment diecuts on the greyboard and once the layers of paints had been added and dried I stuck another over the top cut from textured card and sanded so that it still looked part of the shabby snowy feel.


The only embellishment is a single gem in the middle of the snowflake .....


.... and I added a stand at the back so that it can become a stand-up Christmas card.


I am still making Christmas cards, I seem to be so behind with things but I am sure it will all get finished before the big day.

Media boards, Christmas chipboards and DecoArt acrylic paints and chalky finish paints are all available in the store.

Thanks for stopping by.

hugs Brenda xxx

Thursday 7 December 2017

Color Theme - Stag Head Christmas Tag

Good Cheer Stag Head Christmas Tag by Dana Tatar for Tando Creative

Hi friends! Dana here today sharing the tag I created for the Color Theme this week. I'm well into my Christmas crafting and found this traditional color palette, with the addition of blue and pink, to be really refreshing. I've been waiting all year to use the Stag Head silhouette, which really represents the Christmas and Winter season in a classic way.

How to Emboss Chipboard with Iced Enamels by Dana Tatar

I covered a tag with one of my favorite plaid patterned papers and then wrapped it with a wide piece of dark green ribbon. Next, I used Iced Enamels to emboss the chipboard stag head silhouette and a couple pieces of wood veneer greenery. Then, I glued the embossed pieces onto the center of the tag. Ribbon is a must-add item for all my holiday crafts. I added a bow tie to the stag and a bright red double bow to the top of the tag. I finished this piece with a pink sentiment sticker that reads "Good Cheer."


You can find the chipboard I used for this project in the Tando Creative Retail Store. We'd love to see your creativity! Share your work with us in Tando's Creative Zone on Facebook.

Wednesday 6 December 2017

December Colour Theme

Hello!  This is the last piece of my banner. The colours this month are retro Christmas :-D.


Tando supply a lovely range of Christmasy embellishments.  I have chosen to add a pair of skates to my piece.

Thank you for popping by, take care, Karen x

Monday 4 December 2017

December colour theme

Hello, Carol with you today to share with you my December colour make.

The colour palette for this festive season is:-


and here is the last ATC for 2017….


Tando products used:-
Christmas minis:- baubles, stockings, candlesticks,

Happy Christmas everyone and wishing you a fab 2018!

Carol xx

Sunday 3 December 2017

Sparked easy Christmas ornament with Irit

Hello my dear crafty friends and welcome to our Sparkle week  on Tando blog.
I made this Christmas/Winter ornament tag using just two of Tando products and a lot of DecoArt Media line products with Stampendous glitters over.


The MDF base of one of Shadow box frames was covered with a thick layer of white acrylic paint and DecoArt crackle white paint all together.
When it was dry the blue shades  were added using acrylic liquid paints.
Then the thick layer of glitter was added over the tag.
The reindeer was painted with white acrylic and a very generous layer of delicate glitter was added into the wet paint.'
This is easy to make project for all levels of crafters and you can do dozens of them in no time with similar Tando products.


 Products used from Tando:

Shadow frames
Shadow Frames

Reindeer Small running 
Reindeer Small Running

DecoArt Media line


Friday 1 December 2017

Sparkle cards

For my sparkle project I have made all of my cards I'm sending this year, yes, just the 2! Bah Humbug and all that!

I started off with 2 snowflakes from the {Pack of 5 Snowflakes} and painted them with white acrylic paints.

The first one I used a generous coating of DecoArt {Clear Liquid Glass} and then sprinkled glitter onto it:


The second one I gave a coat of glitter glue:


Both snowflakes have been stuck onto a background of alcohol ink and had gems attached to the middles before finishing off with doodling and a stamped greeting.

Kaz xxx