Saturday, 31 October 2015

Stars in my eyes..


.. for you! Hi, Gez here with a little something for the 'Anything Goes' challenge.

So hard to get good photographs this time of the year because of the lighting! I was trying to get a decent shot of silver acrylic it seems impossible! I hope you like my little plaque!


I've used some of the stars from the {Grab Bag of Stars} you get so many in this bag for such a great price!

Grab Bag of Stars

No need to add any undercoat, I went straight to adding silver acrylic paints..


For the base of the plaque, I used one of the boards from the 74mmx138mm {Mixed Media Boards} pack.
Again you get 5 in the pack for such a great price!

Mixed Media Boards 74mm x 138mm

I did use some white Gesso this time so I could write in it while it was still wet!

I love writing messages!

Next I swiped different colours of Distress Inks onto the board and sparkly glue!


  Gotta have some sparkle & shine!

Thank you for calling and leaving a comment if you get the chance. 


Friday, 30 October 2015

I (HEART) Paris with Irit


Hello my dear crafty friends and welcome to my last October post.
This time it's Tando tray. Yes,AGAIN. I just can't help myself to stay out of them. So it's a heart tray and it's all about my love to one place that most of the people love too. Paris. And I even made a tutorial for you.
Paris for me is love. My love to this wonderful city and to Casablanca movie with this timeless 
line about "We'll always have Paris" – both make this city so special to me. So my most favorite city for vacation is Paris, but I didn't visit there for at least decade. And if you can't visit Paris, you at least make crafts about Paris. So this chipboard altered heart is my tribute to this city of love.
Product list:
Patterned paper: Paper House Productions
Stickers: Paris 3d stickers, Paris Snapshots stickers- Paper House Productions
Chipboards: Heart tray, key- Tando Creative
 Paint, crackle: DecoArts
Mist: Tattered Angels
Resin flower: ETI Easy Cast Resin
Clear embossing ink: Tsukineko
Gold embossing powder, flower mold: WOW! Embossing Powders
Other: buttons, flowers, lace, tulle
Step by step instructions: 1. Cut Paris paper to fit the back of heart shaped chipboard tray and glue it on the back.Glue one bare chipboard heart over the paper.
2. Paint the chipboard frame with red paint and add one step crackle on the top. Glue the painted chipboard over the first bare one.
3. Heat emboss the chipboard key with clear embossing ink and gold embossing powder. Cast rose with Easy Cast Resin inside the rose mold and let it dry for a few hours. Mist a cluster of paper flowers with pink mist and let it dry. Mist the dry resin flower with the same pink mist.
4. Glue the 3d stickers as shown inside and outside the red frame. Add the golden key and gold buttons. Mist the finished piece with a bit of the same pink mist.
5. Glue lace and tulle on the back and make the fancy bow hanger.


Tando pieces used:
 Mini Heart  Printers tray
Mini Heart Printer Tray

Mini's Keys
Tando Mini's - Keys

Thursday, 29 October 2015

Anything Goes - Halloween Card


Hi Tando fans! Dana here today sharing a card for the Anything Goes theme this week. I absolutely love Halloween crafts, so I couldn't resist sharing one last creepy project this month. I created a card base with a mix of patterned paper, corrugated cardstock and canvas and then topped it with a satin bow.


My card was missing the scare factor, so I added a Spider that I colored with black paint and a layer of glaze to the center of the bow. This Grab Bag of Spiders includes 3 different designs in two sizes, so you're sure to find a creepy crawler perfect for your project!

You can find the spider I used for this project and more in the Tando Creative Retail Store! We'd love to see what you create for our Anything Goes Challenge! To be in with a chance of winning some great Tando goodies of your choice, please make a piece based on our weekly themes and link your project, not just your blog, using the inlinkz tool located at the top of the Tando Blog. You don't have to use any Tando product, but, if you do, you will be entered into the draw twice! There are no limits to how many times you enter, however, we do request that you only enter your piece for 5 challenges. We look forward to seeing your creations!

Thanks so much for stopping by today!

Wednesday, 28 October 2015

Stocking Bunting

Hello and I am back with some more Christmasy makes ;-p   This time I have been playing with the *Christmas Stockings* and made some bunting!


The 7 stockings have been covered with old book paper and then dry brushed with some gold.  I didn't use the stocking tops but used some old lace instead to give a more vintage feel.  They have been threaded up with wooden heart buttons and string.


Please keep popping back for more inspiration on how to decorate our chippie!  If you fancy joining in then do take a look at this months tab at the top of the page.

Thank you for looking, Karen x

Tuesday, 27 October 2015

Christmas Robins

Helloooo!  I adored having a play with these little fellas!  These *Robins* are NEW this year and so darned cute!  They come in a pack of 6 and you can choose from MDF or Greyboard.  I used the greyboard ones and made up some decorations...


They have a lot of sparkle so I also took a pic with a flash so that you could see that...


The bodies of the robins have been covered with paper that I decorated myself using bronze paint and some stamping...


Once glued together I covered them with some DecoArt Clear Glitter paint to give them sparkle.  Two of them have been mounted onto matching cotton reels while the other four have been stuck back to back to make two hanging decorations.  Here is the pack as it comes, complete with separate wings and tummies...


I hope you enjoyed a little bit of Christmas in amongst all the Halloween stuff hahaha!!!!!  If you fancy playing along with our themes at anytime than do take a look at the tab at the top of the blog for more information about how you can win a prize if you do.

Take care out there, Karen xxx


Monday, 26 October 2015

Black Halloween by Dee

Hi everyone I hope you are well and those of you that are lucky enough to 
be going to the ministry of mixology are getting really excited.
I know that I am.
I have my third Halloween piece for you this month I
really quite like this young man.
 
I started off colouring my Tando Media board with delusion spray's
(These media boards are fast taking over from Tags and beer mats)
they are much better versatile and very sturdy.
On a piece of kraft paper I stamped my skull and word's
I then coloured with distress inks and white pen. 
Next I assembled everything together finished the edges with crackle 
paste and highlighted with copper and Ta Dah!! 
he was finished
 
I hope you have enjoyed this post as much as I did making it.
I think secretly I must have been a witch in a past life.
Don't forget it would be great to let me know what you think,
about the art bit not the witch one!
Cheers Dee. x

PRODUCTS USED
  1. Tando creative Media board Mixed Media Boards 74mm x 138mm
  2. Deco art crackle paste.
  3. Dylusions Sprays, distress inks
  4.  and stamps from my stash.


Sunday, 25 October 2015

Trick or treat!

Happy Sunday Tando fans! The blog has looked fantastic this week! I am delighted to be sharing something spooky with you today!

My knock a door run! Will there be a trick or treat hiding behind the door... who dares to open it !


For the base of this door I got creative and used a frame and panel from the {Layered Rowing Boat} I loved the long elongated shape.. just what I was looking for!


Layered Rowing Boat with Oars

No need for any basecoat or Gesso.. I wanted rough and ready! The messier the better for an aged look.. the frame and panel were given a coat of walnut stain. Strips of left over cardboard cereal box were used for wooden door panels. 

Being in a creative mood! I decided to see if I could alter one of the locks from the {Locks and Latches} set.. 

Locks and Latches

I used the lock for the keyhole and the fancy edges as hinges for the door..
(cutting the lock top right)

I think it worked out quite well!


I used a couple of other halloweeny elements to decorate the front door..


Tando Mini's - Mixed Halloween


 along with this handsome chappie from the {Set of 3 Bats}

Set of 3 Bats


Time to add my trick or treat to the inside....... 

Booo !


A pair of Skeletons 

I hope you like my spookylicious decoration.

Gez

Saturday, 24 October 2015

spookylicious

Hi, Carol with you to share my take on this weeks theme "Spookylicious"


I have used the following Tando elements:-


Don't forget we have a monthly challenge running and is open to everyone - take a look at the tab at the top of the page for details and how to win a prize!

TFL xx

Friday, 23 October 2015

Happy Halloween with Irit!

Hello my dear crafty friends and welcome to my Halloween week project.
And as always- for like three years- I make a Haunted house with Tando House shaped printer tray.
Nothing can compare to those trays for the Halloween projects!
And even with this single Tando piece and then some stickers, flowers and other embellishments this a wicked Halloween project that can be shown on your door or your wall.


Tando products used:

Mini House Printer Tray 174mm x 114mm

Thursday, 22 October 2015

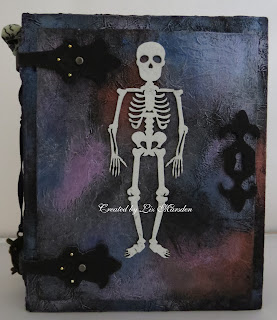
Halloween, the book of the dead

Hi guys, Liz  here today to show you my take on this weeks challenge
Spookilicious,
I altered a paper mache book from my stash and covered it with scrunched up tissue paper strips, then painted it Deco Art white Gesso, to firm the tissue paper up, then i added a few colours of Inka Gold waxes on the top,

I took a skeleton from the skeleton pair pack and painted it with gesso, then when dry added a hint of pumice stone distress ink here and there for shadow, doesn't really show up on here though,
I painted the Tando Creative Key latch embellishment with Deco Art carbon black paint as well as the die cut hinges I had in my stash,
I finished the side of in a similar way too just adding a few charms etc,

This is the inside area on the right, I made a scene on watercolour paper, cut out the moon, adding some vellum on the back of the cut out, I also added a die cut tree, which you can just make out at the side of the house, I know you may need to squint, lol, I then layered up a rickety house die, cut out with corrugated card then painted with Deco Art Paynes grey fluid acrylic paint, and again added vellum behind for the windows,
The witch is coloured with my distress markers, the broom handle and hat has a layer of texture paste first before colouring, then the twigs on the broom has texture paste which i added lines too for depth and design, then coloured, I added a little watered down gess on her face for a ghostly look too, 
At the base are items from the mixed mini Halloween set, the skull painted with gesso and shaped slightly by hand, the pumpkins were coloured with distress ink too then i used ultra thick embossing crystals and heat set the layers a couple of times,

This is on the left hand side, I got the verse of the internet,


trouble was it wasn't quite what i wanted so I added a few crystal stars and  string of  lights behind too,

Hope you like it, and don't forget to join us in any of the themes this month for a chance to win some Tando Creative goodies,
Hugs liz xx

Tuesday, 20 October 2015

Spookilicious: Lights Out Altered Switch Box


Hi friends! Dana here today sharing an altered switch box that I created for the Spookilicious theme this week. I recently went camping with my family and the kids found this rusty switch box in the woods. They were going to throw it away, but I hid this treasure away while they were on a hike! I had a lot of fun giving this piece a second life for the challenge this week!


I embellished the top of the box with a leftover piece of tombstones from the Halloween Art Room I put together last year. I also added a piece of Grass Flexistrip, a Mini Pumpkin and a skull from the Mini Mixed Halloween Set. I filled in some of the empty space with plastic bones and a bit of moss for color. (I didn't think of it until typing up this post, but I may add the Tando designer names to the tombstones!)


I attached a plastic skeleton to the front of the piece. I added another Mini Pumpkin. The entire piece is glued to a coffin piece I had leftover from the Layered Coffin with Cobweb that I assembled last year.


The wires coming out from the top of the box were the perfect support pieces for a couple Bats and a Spider. I painted the bats and spider with black acrylic paint and then covered them with a layer of flock for a furry finish.


Here is what the box looked like fresh from the woods. I didn't alter the finish at all. This natural rusting a patina beats anything I could try to recreate in my studio. I did add some fake spider webs.

If you're looking for a strictly chipboard piece to assemble for Halloween here are a couple examples:

Layered Coffin with Cobweb Detail (Hinges Not Included)


Halloween Art Room


You can find the chipboard I used for this project and more in the Tando Creative Retail Store! We'd love to see what you create for our Spookilicious Challenge! To be in with a chance of winning some great Tando goodies of your choice, please make a piece based on our weekly themes and link your project, not just your blog, using the inlinkz tool located at the top of the Tando Blog. You don't have to use any Tando product, but, if you do, you will be entered into the draw twice! There are no limits to how many times you enter, however, we do request that you only enter your piece for 5 challenges. We look forward to seeing your creations!

Thanks so much for stopping by today!

Monday, 19 October 2015

Spokilicious by Dee

Hi everyone I hope you are well and getting ready for
Halloween. I have for you today a piece
that just evolved.
I started by painting a Tando media board with buff and a 
bit of burnt umber deco art media paint.
I then used black modelling paste through Andy's 
skulldugger mask. 
I had put crackle paste on to card and coloured it with raw umber and
dry brushed with gesso.
The compass was stamped onto a Titan buff painted tando circle
and sprinkles with gold embossing powder.
it was then painted with washes of 
Deco art paint.  
Any of you that know my work will know I am a high fan of 
Deco art's antiquing creams which were then used over 
the top of the skull. once it had dried.

The book plate again was painted with deco art paints. various stamps were used from my stash.
I hope you have enjoyed my Spokilicious piece and don't forget to join us.

PRODUCTS USED
  1. Tando products Mixed Media Boards 80mm x 116mmSkinner Stencil/Mask - SkullduggeryGrab bag of CirclesMini Book Plates
  2. Deco Art paints, antiquing creams, crackle and black modelling pastes. 
  3. Stamps from my stash.