Thursday 27 September 2018

Craftathon 2018 - What I made..

Morning everyone,

This week it's a report on our Craftathon, held in Milton Keynes in aid of Breast Cancer Care.  This great idea was the brainchild of Di, who started crafters all around the country setting up and hosting Craftathons, with the event Di started organising being the one we helped to see through to the day.  A

Several of us ran make and takes, and we had a tombola, raffle with amazing prizes donated by nearly everyone we knew in the crafting world!  We had a cake stall, with vintage china and bunting, a 'Guess the weight' of the Embellishments Jar (it was heavy!), and everyone had goodie bags decorated by the lovely Cassie and donated contents by Susan. 

It was lovely to meet new people, as well as familiar friends and to be part of such a fab team of organisers.  I am proud to know every one of them.

I ran a make and take on my 'Backwards Crackle' on Acrylic, and had fun doing a couple of others, sitting with Celia and painting my t-shirt I'd been meaning to paint for a while, and making a fab bauble with Karen, I'm now hooked on bauble making....

I've attached a few pics, and so far in all we've raised over £10,000 between all the groups around the country, and it's not quite finished yet.  Before we had even hosted the day people were asking if it was going to be an 'annual event', and it went so well we may well do it again!

If you'd like to know more, we have a facebook group here: https://www.facebook.com/groups/1622053067885774/

Samples of my make & take:


The T-shirt I stencilled and painted with So Soft Fabric Paints with Celia.  This took me around 8 hours, I started on Saturday and finished Sunday afternoon, it was so nice to get lost in painting for myself!


And the beautiful bauble I made with Karen,  there will be a lot more of these to come, I'm totally hooked!


Hope you can join us for the rest of the week and my colleagues makes, it was fantastic to be with so many of the team and to raise money for such a worthwhile cause while having the BEST time!  Never forgetting WHY we are there of course. xx

Best Wishes,

Nikki
xxx

Items Used:
So Soft Fabric Paints
Andy Skinner Stencils
Tando Stencils
Acrylic Media Boards
DecoArt Media Line


Wednesday 26 September 2018

Craftathon 2018- What I made Fiona Randall

 
CRAFTATHON 2018 was one Amazing Event.
 A gathering of like minded people who got together to raise some funds for Beast Cancer Care.
The Inspiration for the Event came from The lovely Di Oliver herself.
 
Little did she know the explosion of interest that has taken place in the form of events happening all around the country
 and the shear generosity of the Crafting Community who donated prizes for raffles and Tombola and gave their time and of course funds to attend these events
.
We have a dedicated Facebook Group for everyone to join...you can find it at https://www.facebook.com/groups/1622053067885774/
 
 
These events have raised an INCREDIBLE amount so far....the total currently stands at £10,531.27!!!
 
I attended the Milton Keynes as part of the team organised by Cassie Campbell.
 
I taught a make and take class myself and did five make and takes with the lovely ladies 
Hannah Oxberry, Cassie Campbell, Karen Telfer Celia Low and Leslie Leigh Collins.
 
I tried my hand at  some paint pouring on tags with Hannah.
 
 
 Decorated a Vest with So Soft Fabric paints with Celia.
 
 
Made a stunning Bauble with Karen
 
 
And a first for me Napkin Decoupaged  a set of Drawers with Cassie


And another first Decoupaged two Bracelets with Leslie
 
 
Also taught my own make and take too to some lovely ladies.
 
 
I even put my husband to good use to man the Tombola Stall.
What a Fabulous and Emotional even if tiring day of which I am so proud to be a part of.
 
Here's looking forward to CRAFTATHON 2019.
 
Thanks for stopping by
Fiona x


Monday 24 September 2018

Craftathon 2018

Well, how do I start, Craftathon 2018 has been AMAZING. When I first asked on Facebook if anyone fancied joining me for a Craftathon Day I guessed there would be half a dozen of us raising a few quid for Breast Cancer Care.  What I didn't foresee was the explosion of interest in the Craftathone events and where it took us.

From the end of August right through September there have been MANY amazing people getting together to raise money for this wonderful charity, events were held all over the country and there are still more to come.  We have a dedicated Facebook Group for everyone to join...you can find it at https://www.facebook.com/groups/1622053067885774/

I went along to the Milton Keynes event organised by the fabulous Cassie Campbell and her team.  I had originally meant to help organise this event but sadly cancer took a cruel twist in my life and I had to have more surgery leading up to it.  Tony, my fantastic hubby drove me the 100 miles to Milton Keynes though and I had a wonderful day with wonderful people.

I did 3 make and takes that day with the lovely, Hannah, Karen and Celia :)  I tried paint pouring with Hannah, decorated a T Shirt with Celia and made a beautiful bauble with Karen.

These events have raised an INCREDIBLE amount so far....the total currently stands at £10,531.27!!!


Sunday 23 September 2018

Texture Week- Mini Book by Monika Maksym

Hi all!
It's last day of Texture Week and here the project I've created for you.
I love mini books and I'm trying to build a small collection of them :)
This time I wanted to create something with a shabby twist. 


To start with I've embossed greay board sheet and cut front and back cover and glued them on.


Using Tando mini stencil and Decoart Modeling Paste I've added some texture on both covers.
I've paited them with Chalky Finish Paint in Everlasting. Once dry I've repeated the step using shade Serene.


Crown embellishment was painted in Relic and highlighted with Metallic Lustre Wax in Silver.


I hope you like my inspiration.
See You next time


Products used:


Friday 21 September 2018

Texture Week - by Hannah Oxberry


Hi all, Hannah here, this week is all about texture at Tando Towers! By following a few simple steps you can you can create a fabulously texted tag too.


Firstly, paint your greyboard tag in DecoArt Americana Chalky Finish Primitive. Next, use a palette knife to spread a little DecoArt Texture Sand Paste in areas, stipple the medium and drag the excess over the tag. Once dry, select your stencil and introduce DecoArt Media Modeling Paste through the stencil, again using a palette knife. Your final texture layer is DecoArt Media Crackle Paint, draw this across the tag and over areas of the raised modeling paste.

Once your texture layers are dry, colour the tag using wash layers of DecoArt Media Fluid Acrylics in Paynes Grey, Raw Umber and Yellow Oxide. Work up in intensity, adding neat paint to the wash. Darken the edges of the tag by applying Paynes Grey using a sponge.


On to a heart embellishment, paint a layer of DecoArt Media Fluid Acrylic Cadmium Red, and apply a layer of Crackle Glaze. Once dry accentuate the crackles by adding Carbon Black Antiquing Cream. Wipe away the excess to leave the antiquing cream in the crackles.

Finally, to really make the textures pop; dry brush the entire tag in DecoArt Americana Chalky Finish Everlasting.

I hope you enjoyed this project, until next time - happy crafting!


List of products used;


Size 10 Tag
Small Heart from the Heart Mega Pack


DecoArt Americana Chalky Finish Primitive
DecoArt Americana Chalky Finish Everlasting
DecoArt Media Texture Sand Paste
DecoArt Media Modeling Paste
DecoArt Media Crackle Paint
DecoArt Media Crackle Glaze
DecoArt Media Fluid Acrylics Paynes Grey
DecoArt Media Fluid Acrylics Raw Umber
DecoArt Media Fluid Acrylics Yellow Oxide
DecoArt Media Fluid Acrylics Cadmium Red
DecoArt Media Carbon Black Antiquing Cream
DecoArt Andy Skinner Fossil Stencil

Wednesday 19 September 2018

Texture Week - Splatter Mini Book

Hello!

It is texture week this week on the Tando Creative blog and I decided to decorate one of the Tando mini books using both crackle texture and also creating texture through the paint layers...


After preparing the cover with gesso I added crackle paste through the splatters mini stencil and allowed it to dry overnight.  The next day I painted the whole cover with green gold acrylic paint from Decoart and then added cobalt blue hue with a small brayer to create a textured appearance.  To add even more to the layers I then splattered some watered down primary magenta over the whole piece...

 
I wanted to help the stencilled texture stand out more so used some archival black ink rubbed gently across the surface and also a touch of gold gilding wax.  Then I added some stamping using a script stamp and ink around the edges to create a frame.  Finally for the focal point I painted one of the Tando hearts and added glaze to the top.  Once this was dry I sponged some more black ink around the heart and finally secured it to the cover along with a sticker sentiment.
 
For this project I used:
 
 
Thank you for reading.
 
Happy crafting,
 
Jane xx


Tuesday 18 September 2018

Texture week with Fiona.


Morning and welcome to another project created using this weeks theme TEXTURE.
 
This project is brimming with crackle and texture applied to a triple layered tag using the
 Tags Mega Bundle, Long Tags  and the Hearts Mega Pack from Tando.
 
 
The long tag and small tag were given the crackle treatment using DecoArt chalky finish paints and Crackle medium for chalk paint. Next up was to apply texture sand paste to the bottom of the long tag and the bottom and top edges of the small tag. 3d balls were then added using DecoArt heavy gel medium to the bottom of the long tag for added texture. Raw Umber Media fluid acrylic was then applied neat and in washes to both tags. Then Dark wax applied.
 
To the medium tag modelling paste was applied through the small distressed harlequin stencil. Once dry a coat of DecoArt chalky finish in Treasure was applied to the whole tag. Dark wax was then applied and wiped back to highlight the texture. The edges were then swiped with DecoArt Metallic Lustre in burnished brass to finish.
 
The small frame from France Papillion's Tag kit was assembled and given the texture treatment on the inside and the outside swiped with metallic lustre in burnished brass.
The hearts were then painted and triple embossed respectively and attached to the frame.
A resin embellishment was then given the same paint treatment as the medium tag and attached to the bottom of the long tag.
Al tags were then assembled atop of each other after attaching offcuts of grey board to the backs to give depth and dimension.
Finally a vellum LOVE  word was added to the bottom of the small tag to finish.
 
close up of the detail.
 
 
Thanks for stopping by the blog today.
 
Fiona.


Monday 17 September 2018

Texture Week with Brenda

Welcome to a new week on the Tando Creative Blog and this week we have the theme of TEXTURE.
A few months ago I had one of the Tando Steampunk clocks published in the Craft Stamper magazine so I thought I would share some photos of it with you as it is full of crackle texture and I have added the process steps at the bottom of this post.
This is my clock shabby style.


Here are the steps for you to follow.

I used DecoArt media acrylics and mediums available in the shop.

1. Take the front frame and prepare it by scraping over some modeling paste with a palette knife and adding some sand texture paste in random places. Push the clock numbers into the surface and let it dry.

2. Give the textures and numbers a thin layer of white gesso before adding random patches of white crackle paste around the whole frame. Try to keep the patches almost joining up so it has continuity.

3. Mix washes of the colours used on the background. Use a paint brush to add small amounts to the frame drying between each wash. When dry paint over white antiquing cream and let dry again before buffing it all with a soft cloth.

4. Take the background piece and cut yourself a circular piece of card for the clock face and paint them both with a coat of white gesso to seal the substrate.

5. Mix a watery wash of Cobalt Turquoise mixed with Titanium White on a craft mat and dip the backgrounds into it and heat dry. Keep the clock face lighter than the background.

6. Repeat the dip and dry method with washes of blue/green light, green gold and prussian blue. If after you have finished it still isn't dark enough go through the four colour washes again.

7. Stamp the diagram and text stamps randomly on the background and patterns on the clock face using watering can and coffee archival inks mixed on the same stamp.

8. Using Titanium White and a stencil add some random patterns over the background and heat dry. This adds greater depth and interest to your background.

9. Splatter some watery Prussian Blue and Raw Umber over the background and cobalt mixed with titanium white over the clock face.

To finish the project:
Paint the clock numbers with pewter paint. If you intend to display your clock give everything a coat of varnish before you stick the panels together. I used Soft Touch from DecoArt. Use sandpaper to distress some of the edges and rub in some ground espresso distress ink. Take your chosen embellishments, use the pewter paint and gesso to alter some of them and adhere to the project.
Thanks for stopping by.

hugs Brenda xxx

Sunday 16 September 2018

3D week with Lisa

Hi folks, Lisa here with my project for this weeks theme which is 3D. I chose one of the Tando binders to play with this week as I've been an eager beaver to try them out.


There are 3 of these binders to choose from, I chose the smaller one to try out first.

I used DecoArt Texture Sand Paste and DecoArt Premium Acrylic Paints to decorate the binder then added some stamping.


I tied the binder with a length of black velvet ribbon.


All the products I have used are available on the Tando Website.


Toodles for now,
Lisa x 


Friday 14 September 2018

3D week Clocks and Butterfly's

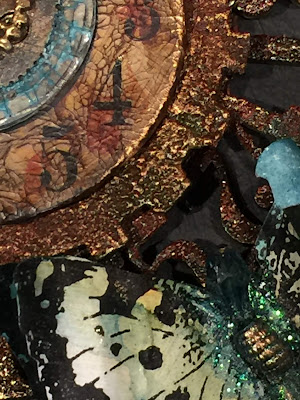
Hi everyone I hope you are okay Dee here with my 3D piece. I absolutely love clocks for some reason and in my stamp collections I have a fair few so thought I would have a play. This is the result not sure what you would call it but think I might need a journal or something to put it on.
  I used Tando's Andy Skinner industrial clock face a large cog and circle from the grab bags & my Deco art products. Starting with giving everything a coat of sand paste once
 I coloured it all with Deco art media fluid paints and some embossing powder melted in patches.
I stamped the clock face onto white card  gave light washes then used the 2 step crackle.
 The butterfly was stamped onto card and I used a mix of ink and very watered down media fluid paints. A few beads and micro glitter from stampendous.
Finally a crystal sticker was used to finish it of, 
Thank you for popping by let me know what you think.
Cheers Dee x


Andy skinners industrial clock face
Circles Grab bag
Large solid cog


Wednesday 12 September 2018

3D - Mini House

Hello!

It is 3D week on the Tando Creative blog so today I am sharing a Mini House...


Although this is a pack of three I decided to only decorated the largest one.  I started by sticking the main body of the house together using red liner double sided tape and then painted the house and roof with white gesso.  Next I used my gelli plate with acrylic paints to add colour to the pieces...


Some extra pattern was added to the roof using the mini criss cross stencil.  The windows and doors were painted using pyrole red and I also used a heart from the mini heart pack.  A bit of gold gilding wax was added around the edges to tie it all together...


Finally I used some stamped images coloured with sparkle pen plus a little bit of doodling and liquid pearls as the finishing touches.

The main products used were:

* Tando Creative Mini Houses
* Tando Creative Mini Hearts
* Tando Creative Mini Criss Cross Stencil

Thank you for looking and happy crafting!

Jane xx