Saturday, 30 June 2018

Spray Ink Week - Pretty in Pink by Hannah Oxberry

Hi all, so it's spray inks and paints week on Tando Creative. Spray inks and paints are a great way of adding a pop of colour to background layers. To this end, I decided to try something a little more colourful than my normal offerings.


The tag project features a decoupage background, layered with script and sheet music. Spray acrylic paints from DecoArt in Turquoise and Magenta add a great burst of colour. Due to their nature the patterns from the paper layers below still show though.


A greyboard heart from Tando Creative introduces the feature element, this too has been decorated in decoupage papers and DecoArt One Step Crackle - the crackles exaggerated using DecoArt Antiquing Cream in Carbon Black. A butterfly in matching colours to the spray paints has been added. 


Spray acrylic paints add such a fun element to designs. Why not try them out and share your designs in the Tando Creative Zone.

Until next time :)

List of products used:


DecoArt Americana Chalky Finish Everlasting
DecoArt Decoupage Glue Matte
DecoArt Decoupage Papers Vintage Silhouette and Victorian Romanca
DecoArt Media Mister Primary Magenta
DecoArt Media Shimmer Mister Turquoise
DecoArt Media Shimmer Mister White
DecoArt Media Fluid Acrylics Metallic Gold
DecoArt One Step Crackle
DecoArt Media Antiquing Cream Carbon Black


Friday, 29 June 2018

Spray ink

Hi everyone Dee here with my make for this weeks spray ink I have done a Canvas using powertex which I  have being dying to get my hands on for quite some time and Tando circles and bubbles stencil. I started by dipping the cloth into powertex (bronze) then arranging it onto the canvas then once dry I took a Andy skinners bubbles stencil and just put circles in random places I used a glitter gel for these It doesn't matter what you use as you can't see it once finished.


A few art stones and twigs were used to form the centre piece this was all given a coat of powertex to hold it. once dry a lot of dry brushing with  gesso, Finally I used bister in blue and brown on the edges and the centre panel. I tripple embossed a Tando circle along with three washers as the size was perfect for the smaller circle stamp. 


I framed the entire piece using the same spray inks & I used powertex 3D flex. I decorated this with the same spray inks as the main canvas.
I hope this has showed how versatile the Tando pieces are and how you can incorporate them into your art projects.
Thanks for popping by Cheers Dee. x


Grab bag of Circles

.

Wednesday, 27 June 2018

Spray Inks/Paints Fiona Randall

Morning all Fiona here with my take on this weeks prompt. I chose to go with making my own spray paints using DecoArt Media Fluid Acrylics. I decorated two Artist Trading Coins which seem to be all the rage at the moment.
 
 
I gave both coins a basecoat of Media Tinting base. Them into two mini mister bottles filled with water I added Media fluid acrylics in both Cobalt Teal Hue and Quinacrodone Gold. I spritzed and sprayed the coins drying between layers until I was happy with the result. Stamping with Archival Ink and Andy Skinners Texture Stamp set came next.

 
Next step was to apply Washi Tape, A paper strip, Vintage child and a sentiment to finish. These are so quick and easy to create and fun too. I hope you give it a go.
 
Thanks for stopping by
Hugs Fiona.


Tuesday, 26 June 2018

Spray ink

Hello, Carol with you today… this week we have been challenged to use spray inks in our projects… Here is my offering:-


My base is a tag which I sprayed with spray ink… I then used the Andy Skinner, "have your say" stencil to spray water onto my tag - leaving it to set for a couple of minutes… I then lifted off the stencil and dried off the tag.  The application of water lifted up some of the colour leaving a shadow on the base.  I then added a aquarelle pencil to the letters and along the edges of the tag, a little white ink was also added for definition.

A heart from the heart grab bag and a little house from the whimsical houses set 1 were painted and then sprayed before giving the edges the aquarelle treatment.  A few stickers finished off the piece.

Please pop back during the week for more spray ink projects.

TFL  xx

Monday, 25 June 2018

Spray Ink Heart by Jane

Hello!

This week the design team are using spray inks or paints with their Tando Creative projects and I decided to use some inks with one of the lovely shadow frames...


I started by preparing all the frame pieces with white gesso then added some stencilling using the mini cog stencil.  When this was totally dry I stuck them together and added some of the mini grey board cogs, tucking them under some areas where the frame was raised.  More white gesso was then added to make sure that the surfaces were all ready for the spray ink...


I have quite a selection of different types of sprays but decided to use a matt red acrylic ink spray to provide my main colour.  I dried with my heat tool between layers and then added another type of spray that contained mica for a bit of sparkle.  When these layers had all been dried off properly I added gold gilding wax to bring out the texture...


Next I added some stamping with black archival ink and the numbers from the Andy Skinner Unexplained stamp set.  From the Steampunk set I stamped the winged key and cut it out, also cutting out the words separately. I sprayed out a little bit of the mica ink onto my glass mat and used this to colour the pieces before adding them to the frame.  To finish I used the black spray from Decoart to add a bit of extra contrast...


Here are the products used...

* Shadow Frames
* Mini Cogs
* Mini Cogs Stencil
* Andy Skinner - Unexplained Stamp Set
* Andy Skinner - Steampunk Stamp Set
* Decoart - Black Media Mister

These frames are lovely to work with and all the pieces took the sprays really well.
Thank you for looking and happy crafting!

Jane xx

Sunday, 24 June 2018

Real or Faux Fabric with Lisa

Hi peeps, Lisa here with my post for Tando Creative.
This weeks theme is 'real or faux fabric'.
I created an ATC (Artist Trading Card) or rather a LATC. Which is a LARGE ATC, which to be honest, is something I kinda made up.... as an ATC is traditionally 2.5" x 3.5" in size where mine is slightly bigger. So, I suppose you could be called a postcard??


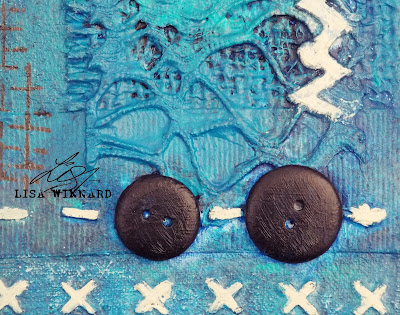
I gathered a collection of different fabrics - canvas, cord, ribbons, burlap... and glued them to a piece of Tando greyboard.


When the fabric had dried, I painted the surface with DecoArt white Gesso. 


I used the Tando Stitches Group 15cm x 15cm stencil with DecoArt clear modelling paste to add some raised stitches. 


And some buttons. Then painted it with DecoArt Premium acrylics. 


Thanks For popping by.
Toodles for now,
Lisa xxx


Stitches Group Mask 15cm x 15cm

Saturday, 23 June 2018

Real or Faux Fabric- Fiona Randall

Morning all Fiona here with my interpretation of this weeks prompt and I chose to go with the real fabric for my piece.
 
 
I started by die cutting pieces from Tando Grey Board sheets to create my wall plaque. These were then given texture and rusty treatments with DecoArt Chalky finish , Media Fluid Acrylic paints and Mediums.
Texture was also applied to a Tando Tag with a brayer and Media Fliud Acrylics.
Next up was to add the real fabric a piece of ripped muslin which was soaked in a watery wash of Quin Gold Media Fluid Acrylic and dried with a heat tool. Rusty texture was applied to a Tando MDF Key and some cocktail sticks. All pieces were assembled onto the tag base, rusty wire circles , a little vintage girl and a stamped sentiment added. The tag was then attached to the plaque to finish.
 
Here is a close up look of the detail.


Thanks for stopping by.
Hugs Fiona.


Thursday, 21 June 2018

Real or Faux fabric!

Hellooooo!  Karen here with my interpretation of this weeks prompt.  I chose to go with real fabric on my project.  I have decorated another of Andy Skinners Fish, this time using bright scraps of fabric which I frayed a little around the edges.  Not sure if you can see that in the photo though, sorry.


The fish was mounted on a large tag which had been painted in different blue's and then treated with Weathered Wood.  When it was dry I added white acrylic which, when nearly dry, I wiped back to reveal more of the blue underneath.

Thank you for popping by today, take care, Karen x

Tuesday, 19 June 2018

Faux Fabric - Brenda

It's faux fabric week and I struggled to think what I could do when I remembered I had a faux linen texture paint effect in my little technique book. Out it came and eh voila a new binder was created with the linen effect on both the outside and inside covers. 
Once it was finished like this it is much easier to see close up and difficult to photo.


I wanted to keep this rather shabby looking so I used both Titanium White and Titan Buff Premium Acrylics with Traditions Glazing Medium. I mixed Titan Buff first 50/50 with the glazing medium and painted sections vertically then took a dry brush and gently pulled the bristles in the same direction wiping the paint off on the kitchen roll between each swipe. I dried it and them mixed the Titanium White in with what was left over, added a bit more glazing medium and repeated the process only this time painting in the horizontal direction


It wasn't easy to capture the effect on camera being a dull day, but here is stage 1 ........


.... and then stage 2.


I think my practice piece gives you a better idea of what the effect looks like.


Next I glued on some magnets for keeping the binder flap closed and added some texture with these Tando stencils and DecoArt White Modeling Paste.


When it was dry I spritzed on some water, dipped a small paint brush in cobalt teal hue and dabbled it around spritzing a bit more and dried it. Then I mixed some raw umber with water in a mini mister and sprayed some of that over and dried it.


I gathered some embellishments and painted the chipboards white and then adhered them to the covers adding all the embellishments .......


...... before having some fun with gesso and mixing my own paint sprays in cerulean blue, prussian blue hue and titanium white media acrylics. I finished off with white and burnt umber splatters and some remnant rubs.


If you were given the challenge 'faux fabric' what would you have made? Comments below please. :o) 


Thanks for stopping by.

hugs Brenda xxx

Sunday, 17 June 2018

Mini Book Store - decoupage project by Monika


 Hi all!
It's Monika here with my latest project. This time I've decided to decorate this mini books storage  using decoupage technique. These  mini books are perfect little gifts, keepsakes or mini albums. Can't wait to build my collection :)


For this project I've used Alchemy paper by Stamperia.


The storage comes in as a flat pack which helps you to decorate it easily! To start with I've primed all of the pieces with Decoart white gesso. Next I've cut my rice paper to the size and covered shelves and indside walls using Decoart decoupage glue. Then I've assembeled everything together using the same glue, and covered the outer walls. Using a make up sponge and Decoart fluid acrylics in raw umber I've darkened the edges and corners and I've added a cup marks and white paint splatters to give it an old, distressed look.

 I've also used Decoart ultra matte varnish to protect the surface.


When my pieces were drying I've prepared my resin embellishments and small greyboard hinges. These were painted with Decoart black gesso, then with Decoart antiquing cream in patina green, once dry I've wiped the excess with baby tissue and applied Decoart metallic lustre in gold rush all over to accent the textures.


Hope you've enjoyed this post. See you next time!

Monika
x


Products used: