This is the colour theme for October:
Monday, 28 September 2020
October Colour Theme
Wednesday, 23 September 2020
Gel printed card
I've used a small circular gel plate to make the background in layers, making sure each layer is completely dry before adding a new one.
Layer 1: turquoise acrylic paint
Layer 2: using the Numbers Stencil add lilac paint onto the gel plate
Layer 3: using the Grid Round Stencil add lilac paint onto the gel plate
Final layer: titan buff acrylic paint and then pull the print straight away onto the card blank.
I've finished off with a butterfly stamp and 'miss you' because we're all missing someone or something right now.
Tuesday, 22 September 2020
Leaf Card
Good morning,
Heidi here to share another blog project using our weekly theme - 'Cards'
I am an avid stamper and card maker, so this theme was right up my street! Any excuse to stamp up some glorious images, ink up some wonderful shapes and partake in lots of fussy cutting.
My card is full of autumnal colours and leaves. Our lovely Di recently added some fabulous new shapes to the website : pentagons, squares, hexagons and triangles. They are just the right sizes for your crafting creations and great on cards as a feature, like I have used here.
Here is how I made my card :
Products Used :
Tando Stencil - Leaves and Bubbles
Hobby Art Stamps - Falling Leaves
Visable Image - Erika's Maple stamps
Versafine Onyx Black Inkpad
Distress Oxide Inkpads -
Crackling Campfire, Vintage Photo, Crushed Olive, Rusty Hinge and Fossilized Amber
Black embossing powder and heat gun
White watercolour card
Brown and Amber Bazzill Card
White card blank 15cms x 15cms
Glue, smoothies and water spray
Card Method :
I started off stamping up all of the leaf stamps required onto water colour card. Cover with black embossing powder and heat with heat gun.
Cover the images with various colours of inkpads and add water spray. Take colour off of the card with kitchen roll to leave water marks.
Cut out leaves and using Crackling campfire, cover hexagons with lots of the ink. Using leaves stencil, cover with Vintage Photo ink.
Cut a piece of brown and amber Bazzill card and matt onto card blank.
Onto a piece of white water colour card, stamp up a leaf stamp around edges and apply Crackling Campfire and Vintage Photo ink to card through 'Bubbles' stencil. Stick down onto card blank.
Edge hexagons with ink using the smoothies and glue down. Arrange leaves over hexagons and stick to card.
Stamp up sentiment, edge with ink and brown card, stick to hexagon centrally.
Thank for stopping by the Tando Creative blog today.
Heidi x
Thursday, 17 September 2020
Anything Goes Week- Fiona Randall
Friday, 11 September 2020
Vintage Week- Fiona Randall
Wednesday, 9 September 2020
A Vintage Tag
Hi there!
Celia here with a tag for our ‘vintage’ theme this week. I have been making a few vintagey things recently, which is a change from my usual bright colours.
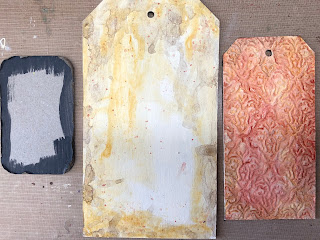
I picked out a couple of tando tags (size 5 and size 9) and a media board. I embossed the small tag with an embossing folder, then primed the tags with Whisper chalk paint and the media board with Relic. Then I added some washes of Yellow Iron Oxide and Raw Umber to age them, followed by English iron oxide on the smaller tag.
Then I added some stamping to the large tag, using the Harebell stamps from Chocolate Baroque. Also some random texture stamps in brown Archival. Then I used some crackle paste round the edges of the small tag and painted it brown when dry, followed by black antiquing cream and some silver gilding paste.
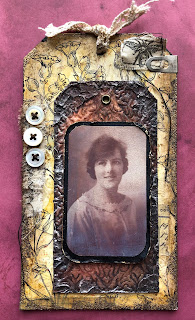
I found an old picture of my granny, scanned it and reduced it in size & printed it onto photo paper. I gave it a coat of matte medium then some One Step Crackle. When this was dried I used grey Antiquing Cream to age the photo. For the media board, I wetted the edges and used a craft knife to peel open some of the layers. Then edged in Paynes Grey and finally treasure gold.
Then I added a few bits and pieces of fabric, washi tape and buttons before glueing the tags together. My granny was an excellent dressmaker, so the buttons and fabric seams appropriate. I edged the large tag with brown ink, then added some vintage gold embossing powder.
Here’s the finished tag. The greyboard is great for throwing lots of different mediums at so you can really go to town when ageing a piece.
Thanks for stopping by!
Celia x
Monday, 7 September 2020
Hochanda Monday by Jan
These tall Journals are a real pleasure to work with. I picked some bright colours for my sample, and gave them a background that I'd learned to do in a Kate Crane class during lockdown. I used the houses and flower pack, painted then doodled (as you get to know my work, you'll see I nearly always doodle somewhere...)
For the insides I used some dot grid paper and marked them up like diary pages, to do lists and a wish list. I also used a couple of gelli plate pulls that were sitting in my stash, and some stamped images coloured up to match.
The binding was really easy to do. I love sewing in signatures with colour threat that I usually use for stitching a quilt top (it's nice and strong)
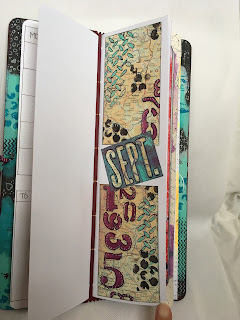
Here's one of the 'diary' pages with a gelli print with some stenciling over the top, and of course, some doodling.
The shows can be found on Hochanda.com and they were at 7am and 11am.


